
What Is a Check Valve? And Why Is It So Important?

Welcome back! Today I’m going to talk about something very different but also very important: The check valve on your single cup brewer…what is it and why you need to know about it like, now. Because it could one day, make all the difference in your brewing efforts.
When Your Keurig Isn’t Pumping Water…
So when you are making coffee, you hear some of the telltale start-up sounds…But then there’s a stall. What the heck is going on? Frustrated, you decide to unplug it and do a little troubleshooting. Chances are the first thing you might reach for is a paper clip which you unbend for the purpose of having a long end to poke with.
You do this to try to clean the exit needle which may have a tendency to clog if neglected. And yes in some cases – this does the trick – that is, if it’s a minor clog. But not if the pumping mechanism is not drawing water up in the first place.
Table of Contents
Now you may still get some gunk out that way , but what’s the next step? Before you bang your head against the wall, or God willing, take a sledgehammer to your brewer – (being tongue in cheek here 🙂 Let’s do this next. Let’s check that check valve!
What is the Check Valve Exactly?
The check valve is a barrel-shaped compartment inside the brewing chamber area of your machine segued in between the tubes that draw in water and dispense it in your cup’s direction. When buildup gets into it it can mess up your brew cycles big time.
It is detachable if you follow the simple guidelines below. Let’s have a walkthrough, shall we?
You need to have these tools handy: a Phillips head screwdriver, pair of pliers, a small scissor (or nail clipper will do) and a zip tie.
Getting Started
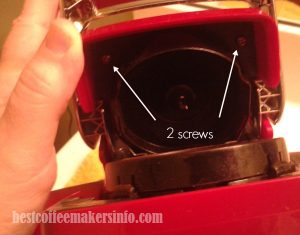
First you may have to tilt your brewer down at a flat angle on a hard surface (I am doing a demo with my own brewer, even though it is working fine, you need visuals for something like this to understand better) Look into the chamber head area…You may have to turn your brewer all the way upside down at a 45 degree angle to really see it.
Oh and be sure your brewer is UNPLUGGED before we proceed 🙂
See those two little screws? We are going to remove those screws.
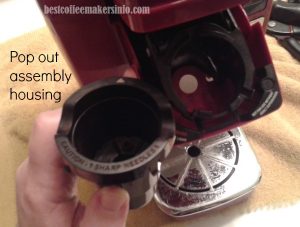
Second, pop out your brew holder assembly. This will make it easier to see what you’re doing (and in the meantime you can give it a little cleaning too)
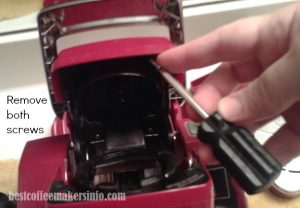
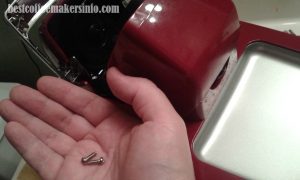
Grab the screwdriver and unscrew the two little screws (hold onto them as they might fall into the chamber somewhere by accident, and land God knows where!)
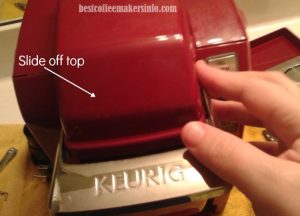
Turn your brewer back upright again. Guide the top plastic piece off.It should maneuver off easily with an up-out motion.
Find The Check Valve Between the Tubes
Now you see all those inner working dealies 🙂 Now since I’ve got a K10, my tubing looks a little different. But if you have any one of the K-Classic, Elite or Platinum series models, you should be able to spot the Keurig check valve right away…it’s the bulgy piece between the two tubes.
Here’s a screengrab (it’s of the video below) of the check valve up close and what it looks like on all the models that have water tanks.
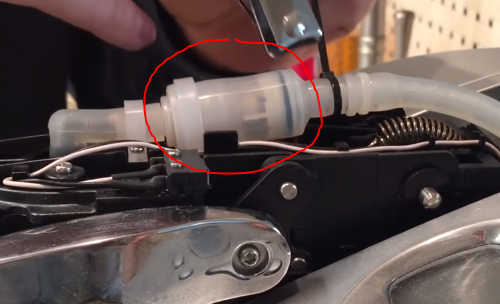
There should be a zip tie in place holding these tubes/check valve together. Snip it…using a little instrument like manicure scissors, or fingernail clippers,is a good idea so you avoid accidentally snipping the tube as well.
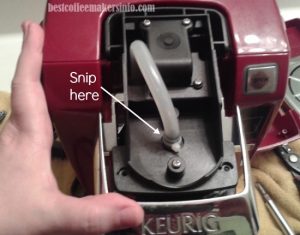
If you’ve got a smaller Keurig like I do, you will have just straight tubing. Since this model doesn’t have a reservoir, I guess it was designed to not need the check valve. However you can still troubleshoot in a similar manner by repeating the steps above up until snipping the zip tie.
You see where there is a “neck” where the tube and check valve connect? Squeeze it a little and you should be able to pull off the check valve. Yay, now you can start cleaning it! Is there buildup? Chances are, there is, and you’re halfway there to getting your brewer in order.
This video should make it all come together easily…This is most likely a Keurig K60/65 by the looks of it.
Video courtesy of Eric Reid
Cleaning the Check Valve
As you can see, look how clean that tube is…so I’m not going to actually carry out these steps. I just wanted to make it easier for you to see what you would need to do 🙂 Just the way you descale your unit with vinegar and water, you can also do this too with the check valve.
Run some water and white vinegar into it and blow on one end to push out the gunky stuff, do this a few times, then rinse it good, and now you’re ready to put it back onto the tubing.
You can perform a cleansing brew with the K-Mini….Holding the tube with one hand and the tube into a cup with the other hand perform a cleansing brew cycle (Be careful that you don’t get splattered with hot water and steam) You may see particles of gunk come out into the cup.
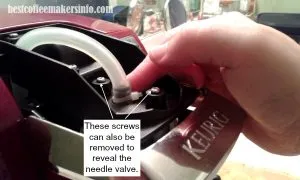
You can also clean the needle valve which is a round disc shaped piece under the tubing -which you will find if you unscrew the two screws right in front of and behind the tube as the image above indicates. A toothpick or canned air will do the trick.
Testing It Out
Replace it just as you did with the same motion with removing it. Now get a zip tie and attach it back to the tube end (same place you took the other one off) Tighten the tie until it is snug and then trim off the excess end.
Now pretty much reverse what you did above…replace cover, screws and the housing assembly…
All right…..give yourself a pat on the back! You did this scary troubleshooting thing. Check it out with a test brew to see how it performs.
Alright -you’re back in business! Treat yourself to a cup of joe right about now – you earned it 🙂
Summary
How did the next cycle go? Hopefully your Keurig is now pumping water again as it did before. I do want to stress that this is NOT the only solution, or make promises that this will be the solution – it’s just one potential one. But a large number of people have come back to claim that this works. So what have you got to lose?
Don’t let a $200 brewer end up in the trash when you can spare 10 minutes to do this necessary step that could save your bacon (I mean, brewer)
Despair… or repair? Your call!


This article and video specifically on the check valve disassembly and cleaning solved the problem I was having with my Keurig. Water moved freely through the machine for tea, etc but k-cup would not brew properly. I did not take the check valve apart but did soak in vinegar solution until it will fill and sink with solution freely. Now my keurig brews k-cups normally. Thanks for the info.
How do you know if valve needs tobr replaced?
I think as long as it’s not cracked or anything, it should be fine.
What does it mean when he says the valve is moving freely. I find it takes some force to blow air through it. Is that normal?
Referring to Eric in the video – when (water) is moving freely it means you have successfully cleared out the buildup. I realize that since this video didn’t involve actual cleaning of the inside of the valve, it’s easy to get confused; he was simply showing the correct procedure how to undo and redo the mechanics so you CAN see what is causing the blockage, Having to blow air through it is not uncommon, especially with a lot of buildup inside the valve.